Hello everybody, I hope you’re having an incredible day today. Today, we’re going to prepare a distinctive dish, yogurt pull-apart bread. It is one of my favorites. This time, I am going to make it a bit tasty. This will be really delicious.
Almond Blueberry Yogurt Bread has a dense yogurt laced batter loaded with sweet plump blueberries. Serve it as a dessert or as a mid-morning snack. Brunch Recipes, Sweet Recipes, Cream Scones, Scone Mix, Breakfast Desayunos, Breakfast Cookies, Fingers Food, Cookies Et Biscuits, Tea Biscuits.
Yogurt Pull-Apart Bread is one of the most well liked of current trending meals on earth. It is enjoyed by millions every day. It’s easy, it is quick, it tastes yummy. Yogurt Pull-Apart Bread is something which I have loved my entire life. They’re nice and they look fantastic.
To begin with this particular recipe, we must first prepare a few ingredients. You can have yogurt pull-apart bread using 9 ingredients and 12 steps. Here is how you cook that.
The ingredients needed to make Yogurt Pull-Apart Bread:
- Get 250 grams Bread (strong) flour
- Take 180 grams Plain yogurt
- Get 20 grams Castor sugar
- Make ready 1/2 tsp Salt
- Make ready 20 grams Margarine (salted)
- Take 4 grams Instant dry yeast
- Take For the icing
- Prepare 20 grams Powdered sugar
- Get 1/2 tsp Lemon juice
Serve it warm, right after taking it out of the oven, alongside some cold milk. Will definitely be a memorable treat for everybody. Baking the bread longer did help a lot, but with stickiness between the layers, it's a lot harder for the layers to separate. Anyway, fifteen thousand lessons later…and the pull-apart bread wound up being really yummy!
Steps to make Yogurt Pull-Apart Bread:
- Put all the ingredients except for the ones marked in a bread machine, and select the "dough" program. Leave it up to the machine until the 1st rising is complete!
- Divide the dough into equal pieces (the number is up to you), round off each piece and rest for 15 to 20 minutes. THE dough is rather sticky, but keep working on it!
- Deflate the dough again, and round off each portion once more.
- Put the dough balls in the baking pan, mist with water and leave for the 2nd rising, about 40 to 50 minutes.
- Put the pan in a bag or something to prevent the dough from drying out. I use a shower cap that I got at a 100 yen shop.
- When the dough has doubled in volume and has filled up the pan, it's done rising. I start preheating the oven 6-7 minutes before the dough has finished rising, since that's how long it takes my oven to heat up. Use that as a guideline.
- Bake for 10 minutes at 180°C, then lower the temperature to 170°C and bake for another 5 to 10 minutes. Adjust the baking times to your oven.
- Make the icing with the ingredients. I brushed it on with a pastry brush, but you can also drizzle it on - it wil look very nice. Adjust the consistency of the icing to taste.
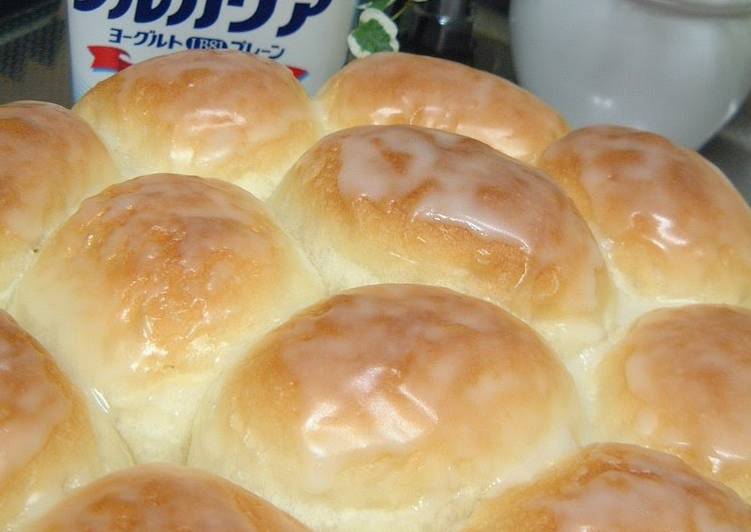
- When the bread has cooled down a bit, brush with the icing. The amounts given will just cover the top of the loaf. If you don't work fast it will be hard to brush the icing on.
- Incidentally, my oven has a turntable, and I baked the bread in a frying pan with a removable handle. Since the oven has a lot of space between the ceiling and the top of the bread, the bread came out in the color shown in the top photo. If it looks like the top of your loaf is browning too fast, cover with aluminum foil.
- These are handy to have baking tools. From the top right going counterclockwise: a notepad to make notes; a calculator; shortening in a tube; an oil spreader; clothespins; protective gloves; a silicon pastry brush; an ice cream scooper; a stick to mix up egg; a shower cap. I try to adapt all kinds of tools.
- Attention: If you use yogurt that's been in the refrigerator for a while, it may become watery and hard. This makes a big difference in the dough. I used yogurt that was just bought. If the dough is too stiff, adjust with more yogurt or milk.
And I'll be better equipped to make it perfect next time. The pull-apart bread turned out so beautiful. Pull-apart bread (also known as monkey bread, depending on how it's baked) is the easiest, fresh-baked party dish out there — an appetizer, bread basket and, sometimes, even dessert all in one. With flavors ranging from savory to sweet, you can make more than one for your next dinner party; guests. Easy homemade pull apart garlic bread.
So that’s going to wrap it up with this exceptional food yogurt pull-apart bread recipe. Thank you very much for your time. I’m confident that you can make this at home. There’s gonna be interesting food at home recipes coming up. Don’t forget to save this page on your browser, and share it to your loved ones, colleague and friends. Thanks again for reading. Go on get cooking!